
How to Package Python Apps With PyInstaller

Have you ever built a Python app and wanted to share it with your non-developer friends? Generally, this is what you would typically go through to set up a Python app on a fresh new machine:
- Download & install a specific version of Python
- Install
pip - Setup a virtual environment,
pipenv,virtualenvorvenvand all that jazz - Installing all dependencies
Think for a moment about how are you going to explain all these steps to your non-developer friends. Without a doubt, setting up a Python project can be super frustrating for non-developers
In this article, I will show you how you can easily package your Selenium App along with a ChromeDriver and add an editable config file outside of the PyInstaller dist directory.
Goals
- We are going to create a simple Python Selenium app that navigates to quotes.toscrape.com to perform a login action
- Make
chromedriver.exepart of our executable app - Read configuration from
example.ini - Read user info from
example.json - These external config files can be updated anytime after
pyinstallercompiles to exe - We will then compile the entire Selenium app into a single executable named
selenium-automation-exe.exe
In case you are lost anywhere or want to jump in quickly, you may refer to the source code here
PyInstaller & Selenium
Basically, Pyinstaller abstracts all these steps by bundling all the dependencies together. In this post, we are going to create a sample project for our Python Selenium app into a single executable on Windows.
Selenium on the other hand is an open-sourced web-based automation tool used for testing, navigating in your browser, automating form filling, etc.
Let’s start!
1. Installing dependencies
For starters, make sure you have the latest stable version of python and pip installed on your machine.
Here I am going to use pipenv as my Python packaging tool of choice. Feel free to use anything that you prefer.
pipenv shell
pipenv install selenium pyinstaller
2. Downloading ChromeDriver
- Download the latest release of chrome driver here based on your Chrome browser version at
chrome://settings/help - Place your downloaded
chromedriver.exeinto a folder calleddriver/
Feel free to change this accordingly if you want, but make sure the chromedriver path is updated in the example.ini later
3. Create example files for your app to read from
example.ini dummy configuration file where your app will read from:
[chromedriver]
path = driver\chromedriver.exe

[website]
url = http://quotes.toscrape.com/

[delay]
seconds = 1
example.json with user credentials:
{
    "username": "johndoe",
    "password": "mysupersecretpassword"
}
4. Creating main.py
import json
import time
from configparser import ConfigParser
from selenium import webdriver
from selenium.webdriver.common.keys import Keys


def main():
    with open("example.json", "r") as f:
        credentials = json.load(f)
        username = credentials["username"]
        password = credentials["password"]

    config = ConfigParser()
    config.read("example.ini")
    CHROME_DRIVER_PATH = config.get("chromedriver", "path")
    DURATION = config.getint("delay", "seconds")

    driver = webdriver.Chrome(CHROME_DRIVER_PATH)
    URL = config.get("website", "url")
    driver.get(URL)
    driver.find_element_by_xpath('//a[@href="/login"]').click()

    time.sleep(DURATION)
    username_form_input = driver.find_element_by_id("username")
    time.sleep(DURATION)
    username_form_input.send_keys(username)
    time.sleep(DURATION)

    password_form_input = driver.find_element_by_id("password")
    password_form_input.send_keys(password)
    password_form_input.send_keys(Keys.ENTER)
    time.sleep(DURATION)
    driver.close()


if __name__ == "__main__":
    main()
We’ll also need to add a function to main.py to get an absolute path to chromedriver.exe while using the --add-binary option later on for pyinstaller. (Reference)
In the same main.py, add in the following:
import os
import sys
def resource_path(relative_path: str) -> str:
try:
base_path = sys._MEIPASS
except Exception:
base_path = os.path.dirname(__file__)
return os.path.join(base_path, relative_path)
def main():
...
# Then modify line 16 to use resource_path:
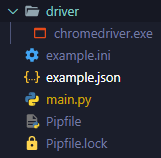
driver = webdriver.Chrome(resource_path(CHROME_DRIVER_PATH))Finally, your project tree should look something like this:
To test this out, run python main.py . Your application should work as stated in our first goal.
5. Making a .spec file for PyInstaller
Okay, here comes the fun part, we are going to create a spec file which tells pyinstaller how to process your main.py script:
pyi-makespec main.py --onefile --noconsole --add-binary "driver\chromedriver.exe;driver\" --add-data "example.json;." --add-data "example.ini;." --name selenium-automation-exe--onefile→ turns the outputs as one exe--noconsole→ console is not displayed when the created exe is executed.--add-binary→ specify the binary file you want to add to the exe. In this case, it’s ourchromedriver.exe--add-data→ specify the data files that you would want to include
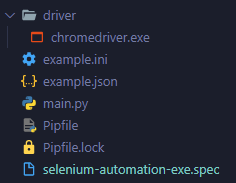
After running the command above, you should see a selenium-automation-exe.spec in the same directory.
6. Modify .spec adding shutil.copyfile
To add config files outside of your final dist folder, you’ll need to modify selenium-automation-exe.spec.
You will need to add the following code at the end of your .spec file (Reference):
import shutil

shutil.copyfile('example.ini', '{0}/example.ini'.format(DISTPATH))
shutil.copyfile('example.json', '{0}/example.json'.format(DISTPATH))
7. Run pyinstaller command
Finally, we will create the executable file with the command below:
pyinstaller --clean selenium-automation-exe.spec
You may find the exe inside the dist folder. Run the selenium-automation-exe.exe to try it out.
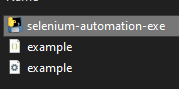
Try changing the username inside example.json and run the exe again, it should log in again with your new username.
That's all! Happy coding! You may find the source code here.