
How To Manage Dotfiles With Chezmoi

There is a bazillion of tutorials and resources on how to manage dotfiles out there. If you haven’t heard of “dotfiles”, they are basically config files in Unix-like systems that start with a dot, e.g. .bashrc, .zshrc, .vimrc, .gitconfig just to name a few.
By default, dotfiles are hidden and they are typically used to customize your system.
Why bother? Well, having your personal dotfiles up on the cloud makes it incredibly easy for you to set up any new environment, like in the case of getting a new laptop, etc.
What you need
- A Git hosting service account, e.g. GitHub
- Git and basic knowledge of how to use it
- Basic Linux commands
Pain Points
The dotfiles community is huge.
As an average Linux user, my developer tool customization outside of VSCode is a total mess. I see sophisticated dotfiles being shared everywhere around the Internet. They are so fascinating, intriguing yet daunting at times.
After spending hours reading, and looking around elegant dotfiles repositories, this article aims to get you started on managing your own dotfiles as painlessly as possible.
The Tradition
Generally, dotfiles are managed in a separate Git directory, usually called ~/.dotfiles. You will then have to create symlinks from there to the original location of the respective dotfile (usually your home directory):
$ tree -a ~/
├── .bashrc -> .dotfiles/bashrc
├── .vimrc -> .dotfiles/vimrc
├── .gitconfig -> .dotfiles/gitconfig
└── .dotfiles/
    ├── .git/
    ├── bashrc
    ├── vimrc
    ├── gitconfig
    └── README.md
The symlinks point to actual files in the Git repo, e.g. ~/.bashrc -> actually edits ~/.dotfiles/bashrc
Finally, the dotfiles are then committed and pushed to the Git hosting service of your choice, e.g. a public GitHub repository, just like this.
However today, we will look into abstracting most of that hassle of managing your dotfiles.
Quick Start With Chezmoi
In my quest to look for a straightforward solution to manage my dotfiles, I found chezmoi. With chezmoi, you can ignore the part where you manually create symlinks. If you need more convincing, do check out why use chezmoi.
What follows is the step-by-step guide on how to start using chezmoi to manage your dotfiles.
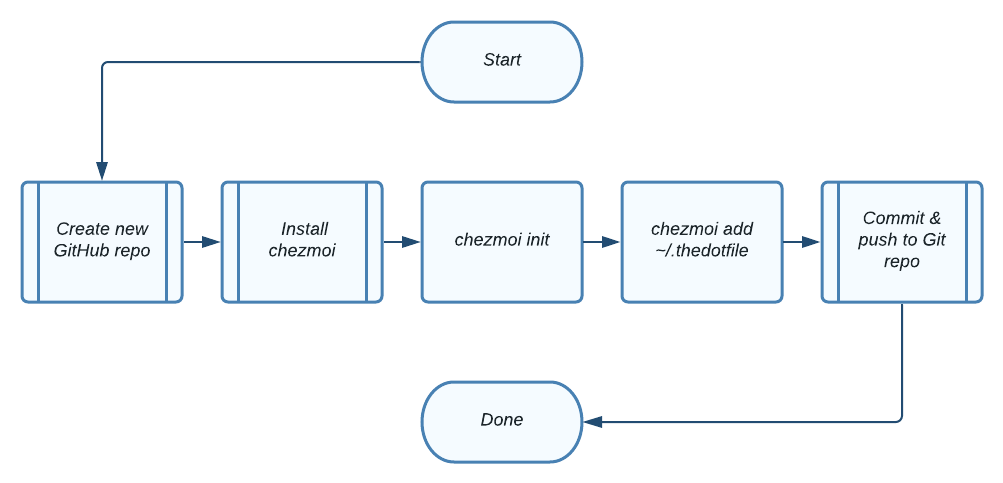
1. Creating a Git repository
Before we begin, you’ll need to create a new GitHub repository.
By convention, the repository name to manage dotfiles is often called .dotfiles or just dotfiles. Here, I’ll assume that you name your dotfile repository as dotfiles.
Don’t get me wrong, chezmoi can also be used with other Git hosting services like GitLab or BitBucket.
2. Installation
Installing chezmoi is easy, simply follow the installation steps here based on the package manager of your choice. A quick one-line installation would be:
# https://www.chezmoi.io/install/#one-line-binary-install
sh -c "$(curl -fsLS get.chezmoi.io)"
3. Init
Remember how dotfiles are managed in a Git directory? Simply run chezmoi init to create a new Git directory in ~/.local/share/chezmoi (source directory in the following) where chezmoi stores its source state.
Later on, you will have to perform a Git commit and push any new changes that you make to the source state just like a normal project in any Git repository.
4. Adding your first dotfile
Before we start, do always keep in mind that the first rule of managing your dotfile is to never push any secrets (e.g. API keys, AWS credentials) to any public repository (not even to private repositories!) in plain text.
In this article, I will be using .zshrc as our dotfile example of choice. In practice, feel free to add multiple dotfiles at once. So, let’s start to manage your first dotfile by “adding” it!
To add your .zshrc file which is typically located in our home directory, run:
# This will copy ~/.zshrc to our source directory at ~/.local/share/chezmoi/dot_zshrc
chezmoi add  ~/.zshrc
Remember this — chezmoi only modifies the files in the working copy, you will have to commit and push any changes yourself (though chezmoi can automate this).
To go to your source directory, simply run:
chezmoi cd # Same as running cd ~/.local/share/chezmoi/dot_zshrc
Here, you will see your .zshrc file as dot_zshrc.
5. Committing and pushing to GitHub
Sounding like a broken record — please make sure that you do not commit any secrets or credentials as plain text.
From here on, it’s like committing and pushing any regular Git projects that you have:
git remote add origin [email protected]:your-awesome-username/dotfiles.git
git branch -M main

git add .
git commit -m "<Initial commit message>"
git push -u origin main
Yay! Now you have your dotfile on your GitHub repository (example)!
Directory Structure Diagram
Git repository] end subgraph "GitHub Repository (remote backup)" H[dotfiles repo] end A -->|chezmoi add| D B -->|chezmoi add| E C -->|chezmoi add| F D -->|git push| H E -->|git push| H F -->|git push| H
Maintaining Dotfiles
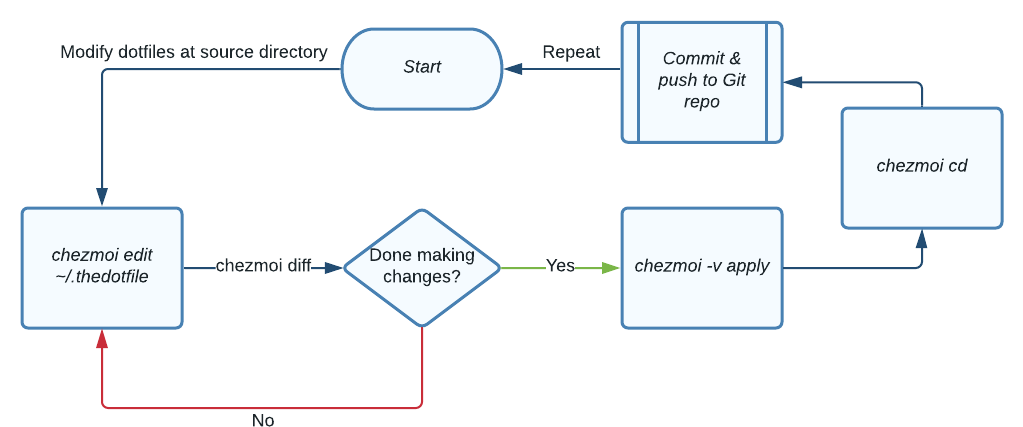
We will never be satisfied with what we have. There will always be more customizations. New files. Updates. Changes.
One important concept — to make any changes to your dotfile, always modify it at your source directory (e.g. ~/.local/share/chezmoi/dot_zshrc); NOT the original dotfile (e.g. ~/.zshrc).
You can imagine modifying anything inside your source directory to be the equivalent of updating the state that you want to store in your public repository.
1. Where to make changes
To modify the source state, you can either:
- Update the source state dotfile directly at
~/.local/share/chezmoi/dot_zshrcOR - A quick way to do so is to use the
chezmoi edit ~/.zshrccommand
2. How to edit your dotfiles
Once you’re satisfied with your changes, save your dotfile and run:
# To view the diff between ~/.local/share/chezmoi/dot_zshrc & ~/.zshrc
chezmoi diff

# To apply the changes to your original ~/.zshrc
chezmoi -v apply
The apply command above will make changes to your original dotfile at your home directory, i.e. ~/.zshrc in this case.
3. Committing and pushing to GitHub (again)
Finally, to update your changes on your dotfile repository, simply run:
chezmoi cd
git add .
git commit -m "<Your update commit message>"
git push -u origin main
Great! You have just successfully updated your dotfile on your GitHub repository!
Adding New Dotfiles
Adding new dotfiles is easy. Unlike “Maintaining Dotfiles” where you have to do chezmoi diff and apply, you simply follow the steps below:
chezmoi add ~/.newdotfilechezmoi cdgit add .git commit -m "<New dotfile commit message>"git push -u origin main- Done!
Using Your Dotfiles
Now that we have our dotfiles hosted on our GitHub repository, we shall look into how to use them on another machine.
On a separate machine, initialize chezmoi with your dotfiles repository by simply running:
sh -c "$(curl -fsLS chezmoi.io/get)" -- init --apply <your-username>
Remember — before you apply any changes to your local dotfiles on this machine, run chezmoi diff to view diff between the dotfiles at ~/.local/share/chezmoi/ and their original location.
If the diff is what you expect to see, run chezmoi apply -v to override your local dotfiles.
At any time — to pull and apply the latest changes from your dotfiles repository, run:
chezmoi update -v
Closing Thoughts
Before we end, you may find my dotfiles here.
In short, there are only a handful of commands that you'll need to get used to (you'll remember them naturally):
chezmoi diffchezmoi addchezmoi updateorchezmoi apply
Managing your dotfile helps to carry your customization with you everywhere you go. I personally find it extremely useful having to work across 3 different machines with different OS.
On top of that, the development setup for new machines is just out of the world.
Next Steps
Honestly, I am barely scratching the surface of what chezmoi is capable of. In case you want to dive deeper, I’d highly recommend you check out chezmoi’s user guide. Here are some slightly more advanced use cases:
- Running custom scripts, e.g. setup script for fresh machine installation (example)
- Managing machine-to-machine differences (Linux, macOS, Windows)
- Templating where the content of certain files (e.g.
.gitconfig) could vary depending on the machine environment
To be frank, there is no “best way” to manage your dotfiles. Using chezmoi appeared to be the simplest solution for my laziness, and it just worked.
That’s all I have for today and thanks for reading!